
This year we made our debut in the Christmas card exchange. If you didn't receive them and you think that you should have, I'm sorry. Creating an organized system of recipients wasn't high on my priority list, especially since they got mailed just a few days before Christmas.

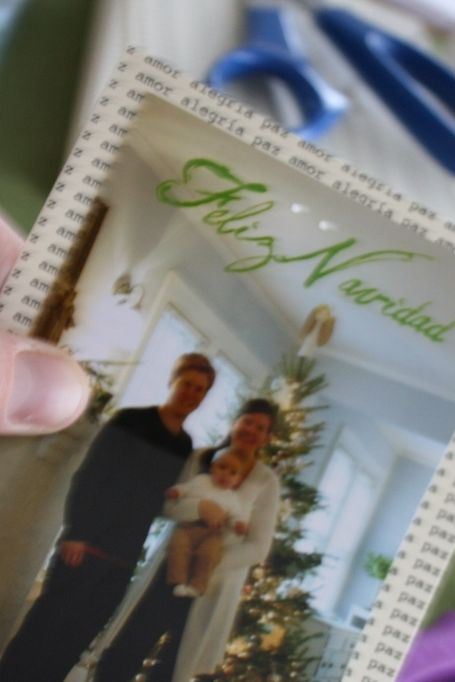
Here it is. Our Christmas card, handmade by me with all that extra time I thought that I had, but really didn't. I had fun doing it though and it saved me bundles!
I also wrote a letter to go with the card. Let's just say I took a few liberties with the truth:
..................................................................................................................................................
Feliz
Navidad, Amigos!
Here
we are, entering the Christmas card shuffle.
We couldn’t be more excited. With
our newest addition, Burl, things are changing and there is a lot to share.
First,
as many of you know, John has been working at his new job (design engineer at Columbus
McKinnon) for a little over a year now.
The best part of the job is that it is two minutes away from our local
climbing gym. That’s right folks, John
is rock climbing and he loves it. I love
it too because I know that any day now, he’s going to get corporate sponsorship
and he can quit his day job. Can we say
“expense paid vacation?” We’re going
places, I can feel it.
Second,
I am a stay-at-home mom now, and it’s nothing but fun for me. I’m fitting into the role quite nicely, but I
have a great example, Martha
Stewart. She has everything I want – a
crafting empire, a name associated with amazing food, and a brief incarceration
in a low security prison that made her cooler, not more dangerous. Now my days are filled with sewing, cooking
over-complicated recipes, and researching easy-to-commit white collar
crimes. Oh, and I watch after Burl.
He’s
a ton of fun. The time is going by so
fast and he’s changing everyday. With
all his little developments, John and I realized that this is the best age for
him to learn a language(s). We have
decided when we are at home with him, we will only speak to him in Spanish. The only problem is that neither one of us
speaks Spanish fluently, so there is a lot of awkward silence. But, we’re sticking with it because Burl can
say mama, papa, hola, and taco and he just formed his first sentence, “¿Dónde está el baño?” Even though he’s only 9 months old, we
couldn’t be more proud of him. He is
speaking Spanish, forming sentences, and learning the most important phrases
first.
We would love to hear from your family. Until we talk again, Feliz Navidad!
..................................................................................................................................................
Pretty loco, huh? I came up with that all by myself. I ran it by John first, who showed a little concern over when, why, and how I came up with it. Then, I made my brothers read it. It's no Sedaris, but I tried. Joseph said it was wordy but ok funny, and Daniel gave me the go ahead on printing.
Just in case anyone is interested, then here are the instructions on how to make the card:
What ya will need:
1. PICTURE: I took the picture myself with the self timer. Then, I cropped it, edited (maybe edited too much because we looked orange and we're more bronze pasty than that), and added the "Feliz Navidad." I did this for free on Picnik. (The same place that I made my dad's Christmas card.) Then I had it printed at Ritz camera for 6 cents. Click HERE for that deal.
2. Some pretty CARD STOCK paper as the background. I had "peace love joy" in Spanish. This is where the biggest portion of my costs came. My printer doesn't do the run off printing, so I had to have that printed at a local printer. It was 75 cents for an 8 1/2 x 11, which I cut down to 4 pieces, 4 1/4 x 5 1/2.
3. ENVELOPES. I found some fun textured kind at Hobby Lobby. They were in the letterpress section. (Oh, how I LOVE letterpress.) Did you know that you can print off a 40% coupon for anything in HL anytime? I carried a supply with me over the holidays. Click HERE for that.
4. SCISSORS
5. MINI WHOLE PUNCH
6. TWINE-Which can be found anywhere. Walmart, by the registers at HL.
7. CORNER CUTTER. I told myself that I wasn't going to round the corners of 100 cards, but I tried it on one and it was so darn cute. So, I cut the corners, which means I punched the corner cutter 400 times. I might have lost my marbles, but it was worth the cute factor.

Instructions:
1. Cut several little pieces of twine. Mine were around 5 inches, but any length would do fine.

2. Center the picture over the card stock.

3. Hold it there and punch two holes in through the picture and the card.
4. Run the twine through both wholes. Throw them in a pile. After stringing all the cards, tie each one. (The first 8 will be perfect knots, the next 92 will be a little shaky.)

5. Cut the corners if that's what ya want. Wa-la. There you go. A Christmas card for less than the stamp:
Envelope: 10 cents
Picture: 6 cents
Card stock: 26 cents
Twine: basically free
Stamp: 42 cents
TOTAL: 84 cents per card, stamp and all.
Now, the fun part: stuffing, addressing and mailing!

I can see this concept working differently. Birthday party invites, baby announcements, etc. Love to see what your creations!


You make me laugh!! I love your letter!
ReplyDeletegot your card in the mail, thanks so much for sending it :) LOVE IT!!! And wow - a tutorial blogged - nice work!
ReplyDelete